I got these two heirloom tomatoes at my local farmer's market for the express purpose of getting seeds for next year.
As you can see, they're getting a little long in the tooth, so I better get to it.
Cutting them open, there's not too many seeds inside so I get what I can and put them on paper towels labeled with each fruit's color.
I'll let them dry then put into envelopes and wait for next year's planting season. Stay tuned!
Darryl
Copyright 2012 - Darryl Musick
All Rights Reserved.
Sunday, September 16, 2012
Thursday, September 13, 2012
The Arctic Orchid...Bletilla
To start, especially if you live in a colder climate than me (Southern California), I'd recommend something like you see on this page...the bletilla orchid.
It's a terrestrial orchid, meaning it grows in soil, not on the side of a tree. It works wonderfully in moist to soggy ground. Think of that faucet you have in the back yard that always spills a couple of drops. That's where I planted mine and I never had to do anything to it...it self watered, was next to the warm house, and built itself into a very thick, big, blooming clump.
It's hardy to 25 degrees. Lower if you cover the deciduous bulbs with mulch after the leaves have fallen off. If you have them planted in the ground, right next to the house, and you live in the lower 48, the heat from the house would probably be enough.
Shade lovers, they do quite well in the ground on the north wall of our house.
Got a moist patch of dirt on on the north, west, or east side of your house...fairly shady? This can go there and you're off to the races in the world of orchid growing. Just bury the bulbs about 2" deep, water in, and watch for results in the spring.
Available at many garden centers for a dollar a bulb, it's also a very cheap way to get into the hobby.
Darryl
Copyright 2012 - Darryl Musick
All Rights Reserved
Tuesday, September 11, 2012
In Praise of Multitaskers - The Garlic Chive
My motto is that it has to provide beauty or nourishment to be in my garden. Once in awhile, you have plants that do both. Now here's one that adds a third category...pest control.
As you can see above, the plant has very show clumps of flowers, almost like little bursts of fireworks. It grows readily from seed and without a lot of help from the gardener.
It grows in clumps and will invaribably spread around your garden.
The plant is pretty much completely edible. Use the flowers as a spice for Asian broths. Cut the long, thin leaves into bits and sprinkle on your food for a garlic flavor. I like to put them in my eggs.
You can cut the leaves as much as you want without hurting the plant. You have to uproot it to kill it.
Planted around roses, garlic chives help to keep the aphids off of the roses. I think this is because the aphids are attracted to the chives more than the roses but it's a great, green method of pest control for your roses.
The one drawback is its readiness to grow. It will quickly spread all over your garden. The pictures here show a planting that came up spontaneously...not from my original planting about 20 feet away. They don't compete with other plants and play nicely with them but they can get to be a bit weedy.
It's easy to control by just grabbing a clump of leaves and uprooting it where you don't want it.
A nice addition to your herb garden. Between this and our basil, it's hard to say which one is used more. Available by seed at most garden centers, hardware stores, and in the produce department at Asian supermarkets.
Darryl
Copyright 2012 - Darryl Musick
All Rights Reserved
Saturday, September 8, 2012
Taming the Wild Orchid...Repotting Epiphytic Orchids
The phalie is an epiphytic orchid. That means when found in the wild, it grows on the side of trees, not in the ground. There are orchids that grow in the ground, the cymbidium is the most well known, and are called terrestial orchids.
Since they do not grow in soil in nature, we do not use soil when growing them in pots in the garden either. Most commonly, epiphytes are grown in chopped up chunks of bark. Some times, people will mount them on cork oak or tree fern bark and hang them on the wall too. I'm using the bark-in-the-pot method.
First, you need to know when to repot. With orchids, it's pretty simple. When they are about to burst the seams of its pot or the potting mix is completely disintegrated is a sign that they need to be repotted. I do mine every 2 - 3 years.
After the bloom is done is the best time unless it's the dead of winter. If it is, wait until freezing temperatures have passed and the weather is warming up.
You'll need the following to repot:
1. A pot to put the plant in. You can use the same one if there is enough room. There should be at lease 2 inches on each side of the plant. A phalaenopsis is a bit unique in that it grows up more than it grows out, so it doesn't need a whole lot of room to spread. Something else, like a catteleya orchid...which grows bulb after bulb on a creeping rhizome...will need more room to expand.
2. Pruning shears
.
3. Pruning seal. This is a tarry like substance that you spray on plant cuts like spray paint to prevent pathogens from entering into a plant wound.
4. Vitamin B-1 solution. This is sold commonly as plant starter or transplanting solution.
5. A flame source like a lighter or candle.
6. A hammer
7. Orchid mix. This is sold commonly at garden centers or online. It is chopped up bark and comes in various size chunks. I prefer the small to medium chunks.
Remove the plant from it's pot. You can see that this phalie, like most that you'll find in supermarkets or drug stores, was grown at a factory nursery in a plastic bag-like pot in sawdust. A few taps on the size of the pot will help it slide off easily.
Remove the mix from around the roots as much as you can. Pull off any dead roots. If you need to cut anything off of the plant with shears, run the blades over a flame first to kill any pathogens that might be there. If you cut off a piece of the plant, seal the wound with pruning seal.
Put an inch or two of orchid mix in the new pot. Hold the plant centered over the mix with the roots spread out with one hand and fill the pot with orchid mix with the other hand to the brim.
When filled, take your hammer with the handle down, and use it to pound down the mix to compact it (they make tools specifically for this but they're based on hammer handles anyway...no need to spend money on them). Do this repeatedly...fill and compact with hammer handle...until you have a tightly compacted mix filled to withing a half inch of the rim of the pot.
Mix a half capful of B1 solution into a half gallon of water and thoroughly water the plant. Now, let sit for 5 - 7 days in a shady area with absolutely no water. If you water too soon, the damaged roots can rot. This gives the roots time to heal. After this, go ahead and put it where it will be permanently...see my phalaenopsis post for tips on where to grow it.
Other chores this weekend:
Sweep the patio...probably my least favorite gardening chore.
Prune the lavender and baby's breath.
Fertilize...for the roses, this will be the last feeding of the year.
Darryl
Copyright 2012 - Darryl Musick
All Rights Reserved
Thursday, September 6, 2012
Calling All Volunteers...
Don't worry...I'm not asking any of you to come to the Cheapskate's house to do free gardening...
See that pretty flower at the top? It's from a Christmas cactus.
We have it hanging in a basket in the backyard and it's a spectacular bloomer...especially in the dead of winter. Wonder why it got it's name...
Anyway, we're not here to talk about the Christmas cactus, we're here to talk about volunteers. You know what a volunteer is, don't you?
A volunteer is almost the same thing. It's a plant that sprouts spontaneously without any input from you but, hey, this guy's not bad. In fact, it's kind of cool.
That's the difference. A weed is a spontaneous plant you don't want, a volunteer is a spontaneous plant that you like and decide to keep.
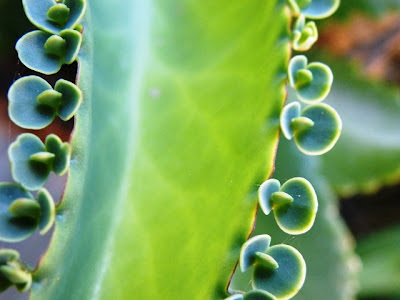
This one grew out of our Christmas cactus basket. It sort of looks like an alien from another planet. It's succulent, like the cactus, so we're guessing it came with it.
For the longest time, we had no idea what it was. Finally, after much googling, I found it...Kalanchoe daigremontiana...also called "The Mother of Thousands."
It gets its name from the many leaflets that line the edge of the plant. They fall off and make new plants...mother of thousands. An apt name.
Cool pink flowers too...we'll keep it around.
- Darryl
Copyright 2012 - Darryl Musick
All Rights Reserved
Wednesday, September 5, 2012
Recipes for a Cheapskate Gardener - Barbecued Veggies
One of the best things about gardening is being able to create your own food from scratch...I mean REALLY from scratch...having everything in your dish come from your own yard.
You don't even have to go to the supermarket...
Among other crops this year, we grew corn, summer squash, onions, tomatoes, and carrots. This is how I use them in a summer barbecue.
First, I pick the squash, onions, carrots and corn and wash them thoroughly (except the corn).
Next, it's on to the tomatoes. Same thing...wash them well and set aside for later.
Chop up the squash, carrots and onions. Chop the onions very fine. Dice the tomatoes and set aside separately.
Get a large ziploc bag. Put the carrots, squash, and onion in it. Also drop in around 3 tablespoons of olive oil, a teaspoon each of kosher salt, pepper, and chile powder. Seal the bag and shake it vigorously.
Now, get a sheet of foil paper and dump the contents of your ziploc bag on it. Loosely gather up the foil paper so that everything is wrapped up. Loose is the key word here, leave some gaps for the heat and smoke to permeate.
Start your barbecue, coals on one side (or if gas, leave at least one side unlit). Put the veggies in foil on the indirect heat side. Leave with lid covered for at least 30 minutes...you can use this time to cook the meat on the barbecue too.
About 15 minutes in, I throw the corn with the husks still on on the indirect side of the grill. These should be done at the end of the original 30 minutes too...they don't take as long to cook as the carrots do.
Serve as is on a plate and sprinkle some of the diced tomatoes and parmesan cheese on the veggies. The picture at the top shows what the veggies and corn looks like with my fabulous grilled duck breast.
Aside from the meat, this meal probably cost me less than a dime. It is also fresher and tastier than anything you can get at a supermarket or a farmers market. Can't you just imagine how good it tastes?
-Darryl
Copyright 2012 - Darryl Musick
All rights reserved
Tuesday, September 4, 2012
FIELDS OF DREAMS - Season Wrapup - 2012
Our Field of Dreams reports might not be complete, but they’re up-to-date, meaning that every existing Major League Baseball stadium that we’ve seen a game in has been posted.
Meanwhile, we still have four stadiums that we either have visited but not seen a game in, or…in the case of Oakland…it’s been such a long time that the information is no longer valid. Here are those four stadiums and our limited impressions of them…
Comerica Park, Detroit, Michigan – Great looking stadium in downtown Detroit. Whether that’s good news or bad news depends on your opinion of the city. There’s a kid’s play area in the outfield featuring a little Ferris wheel and the tigers on each side of the scoreboard let you know what the home team is.
Here are the stats:
Opened: 2000
Surface: grass
Construction cost: $300 million
Capacity: 45,010
Field dimensions: Left Field – 345 ft.; left center – 370; Center Field – 420 ft.; right center – 365; Right Field – 330 ft.
Home team: Detroit Tigers (American League, MLB) 2000 - present
Events attended: none, just visited the stadium when the team was away.
The View from the Former McDonald's
U.S. Cellular Field, Chicago, Illinois – A fairly unloved replacement for the legendary Comiskey Park, home of the White Sox. Steep, the upper deck is set fairly far back. The front row of the upper deck is farther away from the field than the last row of the old stadium. It’s also famous for its exploding scoreboard, which shoots off fireworks when the Sox hit a home run.
Here are the stats:
Opened: 1991
Surface: Bluegrass
Construction cost: $167 million
Capacity: 44,321
Field dimensions: Left Field – 330 ft.; left center – 375; Center Field – 400 ft.; right center – 375; Right Field – 335 ft.
Home team: Chicago White Sox (American League, MLB) 1991 - present
Events attended: none, just visited the stadium when the team was away.
Wheelchair seating is spread out, mostly in the top row of the lower deck and into the outfield. The seats we examined look like they’d be a good place to watch a game from. There’s a very good ADA information page on the team’s website, including a map of wheelchair accessible seating. It’s one of the best we’ve seen.
Transit is excellent with an adjacent, wheelchair accessible Red Line station of the Chicago L.
Rogers Centre, Toronto, Ontario, Canada – The first successful retractable roof stadium. Notable features include the hotel in the outfield and artificial grass that causes no small amount of consternation and injuries to visiting teams. Located right next to the CN Tower.
Here are the stats:
Opened: 1989
Surface: AstroTurf GameDay Grass
Construction cost: $570 million
Capacity: 49,539
Field dimensions: Left Field – 328 ft.; left center – 375; Center Field – 400 ft.; right center – 375; Right Field – 328 ft.
Home team: Toronto Blue Jays (American League, MLB) 1989 - present
Events attended: none, just visited the stadium when the team was away.
When we went here, we went in a side door to see if we could get access. We walked right in…no one was there and the entrance went right to the seats. This was just before 9/11 so I assume the security has improved since then. That day, though, we wandered throughout a completely deserted section along the third base line. Originally, we had planned to see a game but when we found out they charged more for wheelchair accessible seats than comparable normal seats, we declined.
According to the team web site, wheelchair seating is dispersed throughout the stadium. The team has one of the weakest ADA information sections on their site, so you’ll want to call them at 416-341-3004.
While they are improving slowly, current Toronto transit is weak in accessibility.
Picture courtesy of Wikimedia
Bryce Edwards under CC-BY License
Oakland-Alameda County Coliseum, Oakland, California – Actually, my wife and I saw a game here way back in the 1980’s. The stadium has undergone massive changes since then, so it wouldn’t be fair to review the stadium on such old impressions. I do remember there being very little shade, however. Oakland is a team dating back to 1901 when it started in Philadelphia. The Athletics moved here from Kansas City in 1968. The team has had some well known and controversial players such as Jose Conseco and Mark McGwire. Others to wear the A’s uniform include Hall of Famers Dennis Eckersley, Catfish Hunter, and Reggie Jackson. It’s also a multipurpose stadium, shared with the NFL’s Raiders, so it has some of the largest foul ball territory in the league.
Here are the stats:
Opened: 1966
Surface: Bluegrass
Construction cost: $25.5 million
Capacity: 35,067 (artificially limited)
Field dimensions: Left Field – 330 ft.; left center – 367; Center Field – 400 ft.; right center – 367; Right Field – 330 ft.
Home team: Oakland Athletics (American League, MLB) 1968 – present, Oakland Raiders (NFL) 1966 – 1981, 1995 - present
Events attended: one
A few things stand out about the Coliseum. First, the team has trouble drawing a good crowd, even when it is playing well. I remember seeing them in the playoffs with tickets still available at the gate. To alleviate this, the top deck was covered with a tarp taking those seats away from fans and artificially limiting capacity to under 36,000. Football capacity is almost double.
A new, and in my opinion, very ugly upper deck was added to center field to accommodate Al Davis’s desire to sell more tickets to football games. This deck has become known as “Mount Davis” in his honor.
The team had a proposal to move to nearby Fremont a few years ago that fell through. Now, it is in talks with San Jose to move the team there.
Wheelchair seating is available on most levels. The team maintains a very good ADA page on their website that includes a map of wheelchair seating. Call (877) 493-BALL for tickets.
Transit is very good to the park via BART, a subway that services the station via a pedestrian bridge only open on game days.
-Darryl
Copyright 2010 - Darryl Musick
All Rights Reserved
Monday, September 3, 2012
Calling All Deadheads...This Week's Gardening Chores
No, there's no Dead concert going on. I'm talking about cutting off spent rose blossoms. They look dead, hence the term "deadheading."
Here's a bush perfect for this . To deadhead, find the first set of leaves under the dead blossom with at least 5 leaflets. You can go a little lower too, if you'd like...to keep the shape desired, etc. Cut on a angle just above those leaves.
When there are multiple deadheads on a stem, I like to cut low enough so I can get all of them in one cut.
Why deadhead? First, it makes the bush look cleaner and nicer. Second, dead blossoms left on the plant tend to turn into seed pods (rose hips) that inhibit more blossoms from forming on the bush. When you deadhead, you cut off the hormones that tell the plant to shut down flower production...flowers then sprout from the junction of the leaflet and stem where you cut.
Being early September, this will be the last deadheading of the season. This is pretty much the same for most of the continental United States. Along with the final deadheading, we feed our roses one more time with fertilizer.
Now, we'll just let the roses be for the rest of the year. No cutting, no feeding (continue to water as needed, though). Those rose hips that develop will help nourish the plant for the cold weather to come.
Other chores going on for the Cheapskate this weekend:
Mowing the lawn
Fertilizing the garden
Checking spray patterns on the sprinklers and drip emitters
Darryl
Copyright 2012 - Darryl Musick
All Rights Reserved
Here's a bush perfect for this . To deadhead, find the first set of leaves under the dead blossom with at least 5 leaflets. You can go a little lower too, if you'd like...to keep the shape desired, etc. Cut on a angle just above those leaves.
When there are multiple deadheads on a stem, I like to cut low enough so I can get all of them in one cut.
Why deadhead? First, it makes the bush look cleaner and nicer. Second, dead blossoms left on the plant tend to turn into seed pods (rose hips) that inhibit more blossoms from forming on the bush. When you deadhead, you cut off the hormones that tell the plant to shut down flower production...flowers then sprout from the junction of the leaflet and stem where you cut.
Being early September, this will be the last deadheading of the season. This is pretty much the same for most of the continental United States. Along with the final deadheading, we feed our roses one more time with fertilizer.
Now, we'll just let the roses be for the rest of the year. No cutting, no feeding (continue to water as needed, though). Those rose hips that develop will help nourish the plant for the cold weather to come.
Other chores going on for the Cheapskate this weekend:
Mowing the lawn
Fertilizing the garden
Checking spray patterns on the sprinklers and drip emitters
Darryl
Copyright 2012 - Darryl Musick
All Rights Reserved
Sunday, September 2, 2012
For Whom the Bell Tolls...
This year's vegetable garden went like this...everything was planted in March, transplanted in April. Harvest came with summer squash first, onions and carrots next, corn, tomatoes (still going strong), and bringing up the rear are our bell peppers.
Looks like we'll have a bumper crop from our two little plants. Grown exactly like a tomato plant, except without the need for cages or stakes, they start off a little slow but when they come to life they really start production. Look at all the flower buds on this guy.
Watered by our drip system for 10 minutes, we start with every three days at the beginning of the season, every two days with spring warms up, and everyday in the blast furnace heat of summer that we get here in the San Gabriel Mountain foothills each summer.
Fertilizing happens every 2-3 weeks. This is the fertilizer I prefer to feed with:
Now, in August and September, I can go out and pick a fresh pepper almost everyday for use in salads, side dishes, and more.
Our bell peppers are the little plants that could.
-Darryl
Copyright 2012 - Darryl Musick
All Rights Reserved.
Looks like we'll have a bumper crop from our two little plants. Grown exactly like a tomato plant, except without the need for cages or stakes, they start off a little slow but when they come to life they really start production. Look at all the flower buds on this guy.
Watered by our drip system for 10 minutes, we start with every three days at the beginning of the season, every two days with spring warms up, and everyday in the blast furnace heat of summer that we get here in the San Gabriel Mountain foothills each summer.
Fertilizing happens every 2-3 weeks. This is the fertilizer I prefer to feed with:
Now, in August and September, I can go out and pick a fresh pepper almost everyday for use in salads, side dishes, and more.
Our bell peppers are the little plants that could.
-Darryl
Copyright 2012 - Darryl Musick
All Rights Reserved.
Labels:
bell pepper,
fertilizer,
food,
garden,
gardening,
plant,
plants
Friday, August 31, 2012
Kamanawanalei'U
We live at the edge of the San Gabriel Mountains just east of Los Angeles. It gets very hot here in the summer and occasionally down to about 28 degrees in winter.
Plumerias, especially white varieties, do very well here. We've tried other colors but only the white survive.
They go dormant in the cool season but grow like weeds in the warm months.
These flowers, used to make leis in Hawai'i, are beautiful. Sometimes, strong winds will break off a branch. We stick in in the ground and it grows...then we have another plumeria bush.
I only water with the same schedule as our roses, and fertilize a little when I put some on the roses too. We get bunches and bunches of beautiful, fragrant island flowers every year.
-Darryl
Copyright 2012 - Darryl Musick
All Rights Reserved
Plumerias, especially white varieties, do very well here. We've tried other colors but only the white survive.
They go dormant in the cool season but grow like weeds in the warm months.
These flowers, used to make leis in Hawai'i, are beautiful. Sometimes, strong winds will break off a branch. We stick in in the ground and it grows...then we have another plumeria bush.
I only water with the same schedule as our roses, and fertilize a little when I put some on the roses too. We get bunches and bunches of beautiful, fragrant island flowers every year.
-Darryl
Copyright 2012 - Darryl Musick
All Rights Reserved
Subscribe to:
Posts (Atom)