Showing posts with label garden. Show all posts

Friday, June 10, 2022

THE CHEAPSKATE RURAL GARDENER: Project Greenhouse - The Finale


The garden center/nursery/conservatory...whatever you want to call it...is complete. The last step was to build a potting bench. If we're going to go whole hog and build a greenhouse, a potting bench is a logical next step. It'll make working on our plants much easier than just sitting on a patch of ground with some potting mix and a pot.


So, now my job is to take these four boards and make a potting bench out of them.


Before I started, I took the plywood boards and painted them with polyurethane to weatherproof them. I also painted an orchid on the board that would be the backsplash. It's an orchid that is named after my wife's grandfather (Catteleya Melecio Huerta 'señor perfecto').


Next, I had my wife stand at a few counters in our house and tell me which is the perfect height for her. 35 inches is what we determined so I laid out a couple of 4x4's...which would be the back legs of the bench...and measured 35 inches from the where the surface of the bench would be.


I cut my lumber using my miter saw, then positioned the back legs and backsplash to the proper position. I secured the backsplash to the 4x4s using 2 inch wood screws, then attached an "L" bracket to the 4x4s, which will be used to hold the larger plywood board that will make the surface of the bench.


I attach the bigger board to the brackets with 5/8 inch wood screws, put on the front legs (which I sink two 2 inch wood screws into each corner to the 4x4s), then put two more "L" brackets on the front legs and the plywood.


The last step is to put a bead of caulk where the two pieces of plywood meet, to keep it waterproof, and screw a big hook into the side where I can hang a watering can.


Put it up against the back fence, next to the greenhouse, and it's all done. Now, the only thing left to do is start using it. 

Darryl Musick
Copyrigh 2022 - All Rights Reserved

Monday, June 6, 2022

THE CHEAPSKATE RURAL GARDENER: Project Greenhouse - Accessorizing


The greenhouse is built but the work isn't done. I've still got a lot to do...

To start with, I'll need something to set my plants on. Just setting them on the ground would not be efficient, I need some benches.

I could go and just buy some. A six foot plastic bench would be $150-200. I'd need 2 plus a five foot bench. I'm a cheapskate, that's getting pretty spendy.

Instead, I'll build my own. I have a nice pile of 4x4 scrap redwood and pressure treated wood, which is resistant to rot, so I won't have to spend any money on that.


1x6 redwood milled lumber board can be $25-40 each but six foot long 1x6 redwood fence planks are only $5 each. That's the perfect size and the benches don't have to be perfect or pretty so I'll get a dozen of these instead.


Time to dig out my trusty miter saw.


I cut my 4x4's into 11" lengths. I'll need 15 of those, the benches will have 2 legs at each end, 1 leg in the middle for added support, a couple of fence posts will be cut into 17.5 inch lengths to provide a platform between the fence planks and 4x4's to be able to attach easily.


I lay out my 4x4's, and put my planks on top. I sink in some 2" wood screws at the end of each plank and through the middle. 


The first bench I make is five feet long so I can turn it sideways into the back of the greenhouse.


The next two benches come together quickly and are six feet long to go on the side of the greenhouse. Each bench is 13 inches high, I can add another level above it easily when I run out of room. Now I have a bench around 3/4 of the greenhouse. It takes me about two hours and a total cost of about $75 to make the three benches.

I like gardening, as you can tell, but I'm not one of those who like to manually water each one of my plants. Over the years, I've gotten quite good at installing automatic drip and microsprinkler systems so I can spend my time doing something else. This greenhouse will be no different so now I have to put in an irrigation system.


You might have noticed in the pictures of the greenhouse and construction that there is a sprinkler at the right corner, just outside of the greenhouse. This is no accident. In fact, that's a big reason I built the greenhouse where I did.

In addition to being a patch of grass that wasn't needed, the location had sprinklers. That means there's a source of water already there that's connected to an automatic timer. I could make this work to my benefit.

Before I built the greenhouse, I capped the second sprinkler by the back fence taking it out of service. Next, I dug the sprinkler in the picture out. I unscrewed the sprinkler, put in a stainless steel extender pipe, and screwed the sprinkler back on as a place holder/cap until I was finished building.

Now, I take the sprinkler back off and replace it with a $2.99 valve that I bought at our local Ace Hardware.


I got a brass hose end repair with a fluted nozzle.


I drill a hole in the plastic glass, thread a 1/2" drip hose, through it, and fit the end of my hose (I've had some sitting around left over from an earlier project) over the nozzle and clamp it on with the clamp that came inside the hose repair kit.


I run the hose around the frame of the greenhouse and attach with some plastic clips that I got from Amazon for around $10.

Next, I'll strap some microsprinklers to the side of the greenhouse. I figure I'll need 2 on each side for a total of four. This will be pretty much all I'll need for water although I anticipate that some plants in the future may need their own drip line...but that's a job for another day. It's also cheap and easy to do.


Now, I just have to go to my current sprinkler system timer and put in the schedule I want for the water to go off. I think I'll go for 4 minutes of water every other day, plus a minute or two during the hottest time of the day in the summer to help keep it cool, to start with and make any adjustment as necessary as time goes on.


I have a successful test and the wet gravel, after the sprinkle, helps keep the humidity up too.

Finally, as you can see the picture at the beginning of this post, I put a high/low thermometer. This will not only tell me the current temperature but also the hottest it's been and the coldest it's been in the last 24 hours.

This is crucial because the plants that will go in here will be too tender to survive outside when the weather gets below freezing. In the winter, I'll monitor this and be ready to either move my plants or put in a heater if it gets too cold. My hope is that it'll retain enough heat to make that not necessary but this is cheap insurance to make sure that doesn't happen.

Alright! The greenhouse is officially open for business, now I just need some plants. I've already ordered a couple of orchids to get started (you can see one on the bench in the photo above). We'll see how this goes.

Darryl Musick
Copyright 2022 - All Rights Reserved

Wednesday, March 16, 2022

The Cheapskate on Tour...St. Croix


Not too much gardening at home this week because we're away in St. Croix in the U.S. Virgin Islands. Here is some of the island flora...


Above, is the island's chestnut tree.


This is a flower from the trumpet vine that looks like a wisteria with huge flowers.


A red flower from the succulent planter outside of our room. I can't remember the name, anybody know?


The fruit on the calabash tree. They make maracas out of this fruit.


This is a dried up flower from the calabash tree.


Darryl
Copyright 2013 - Darryl Musick
All Rights Reserved

Wednesday, July 28, 2021

Recipes for a Cheapskate: Poppin' Peppers


Too many things to do this weekend to really get the dirt under my fingernails but I did get to harvest my jalapeño plant.


As the peppers were starting to turn bright red, that signaled that the time had come.

I got 13 peppers, just enough to make into a side dish for this week's barbecue.
So what can I do? Make mini jalapeño poppers.
Easy in concept but the smaller size of these peppers make a bit hard to stuff.


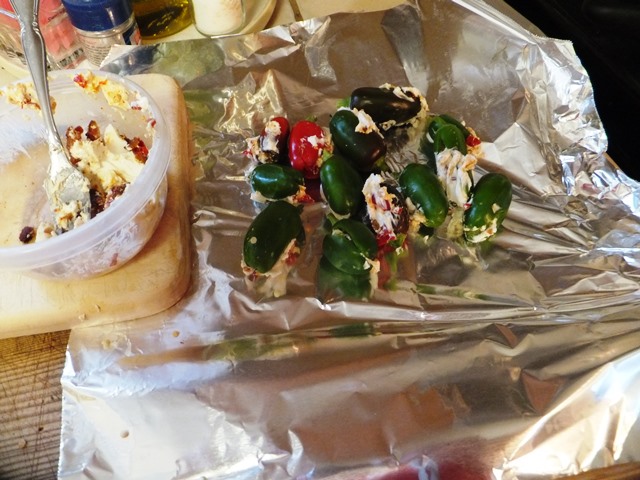
Each pepper is sliced on one side, propped open, and stuffed with my homemade mixture of cream cheese, chopped serrano peppers, and bacon.


I wrap them up in foil, poke a few holes in the top, and then put on the grill with our burgers.


The finished product looks something like this.

Darryl
Copyright 2013 - Darryl Musick
All Rights Reserved

Friday, September 18, 2020

Visiting a Couple of Old Haunts in Munich


(NOTE: We're trying to see different things on this trip to Munich than we did on our last trip. You might want to check out our previous trip to Bavaria to see some of the big sites we won't be covering on this trip as well)

(Please read our Covid 19 Statement first - Ed) Although, we're trying to concentrate on new experiences while we're in Munich on this trip, there are still a few places and experiences we want to have again. It's like visiting old friends, a comfortable and familiar feeling you want to have over and over.


Our hotel is not far from the Englischer Garten, Munich's large central park. It's a pleasant walk through the south of the park...past the families and naked Germans in the sun...along and rushing canal called the Eisbach.


Kids play along banks under the watchful eye of parents.


On this hot day, it's too inviting to just hop in and float downstream.


You know you've reached the southern end of this park when you see the surfers taking turns on the permanent wave created by the rushing water.

Keep walking and a couple of blocks later you'll be in the city's main square, Marienplatz.  Last time here, it was a magical place with great sights and wonderful sidewalk entertainment. Today, construction projects take up much of the square.


We'll double back here in a little bit but we are focused on another destination just a block away, one of Europe's best markets, the Viktulienmarkt.


On the cobblestones, under shady trees, you find fish mongers, butchers, cheese vendors, honey dealers, along with various fruits and vegetables. In the middle, there's a biergarten.

Our last trip here, this was the first German biergarten we went to. I had about the best sausage I've ever had here and didn't get the name. I wanted to see if I could find it back in the states but didn't have any luck.


Well, now we're back and I've got a few more German lessons under my belt. I ask our server what that sausage is called.

"Which one?"

"That one, the red sausage."

"We just call it 'red sausage'"

Well, that clears that up then...

After lunch, we hit up a coffee stand for a pick me up along with a few sweet fruits.  We wander back toward Marienplatz, stopping by St. Peters Kirche, a beautiful gothic church between the market and the square.


Wheelchairs enter on the side and then have pretty much free reign throughout the building. Various niches line the sides, including one with the bones of a saint, this is Saint Munditia. Munditia was martyred in the 4th century and is the patron saint of spinsters. Her slightly mummified skeleton with bright, fake eyeballs stares at us from her glass coffin.


Marienplatz starts here and we take in a glockenspiel show before heading off to dinner.

A couple of stops along the S Bahn later, we're at Augustiner Keller biergarten, one of my favorite places in the world.


This large biergarten by the Haupbahnhof is more park-like than restaurant. Although the brewery dates back to 1328, this biergarten and hall only from 1862.


We came here more for the dessert than the brew, to have that most awesome of donuts, the auszegone. About ten inches across, it's like a giant, raised donut without a hole. Instead, there's a flat bit of dough stretched across the middle. It''s deep-fried and then sprinkled with powdered sugar on top.

We get two, and they're every bit as delicious as we remember.


The schweinhocken (or pork shank) along the side is also delicious.  It's so moist, tasty, and tender in the middle yet the skin is cooked to a very hard crispness that you can break off like chips...chips that come with succulent pork fat attached.

It is just the epitome of great biergarten food, washed down with liters of helles beer from the brewery's wooden kegs.

Kind of quiet in this early evening, nevertheless, we enjoy ourselves and talk it up with a few other customers before calling it a day and heading back to the hotel.

Darryl Musick
Copyright 2016 - All Rights Reserved

Photos by Letty Musick
Copyright 2016 - All Rights Reserved

Friday, February 1, 2019

GARDENING: The Charlie Brown Christmas Cactus


Our Christmas cactus has seen better days. My wife said to do something about it so I'm repotting it. This is how it looked before I started.


First, it's off to the store to get some cactus potting mix.


Next, with some gloves because there is still a few small and sharp needles, I remove it from the hanging basket and knock off all the old mix.


I find an appropriate pot to put it in.


Fill about half way with mix...


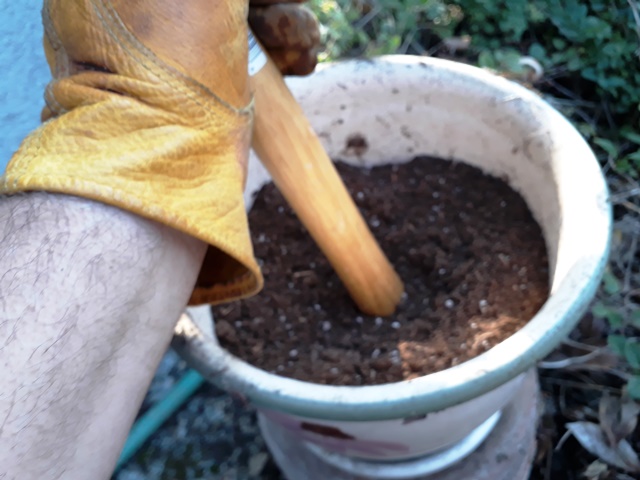
...and tamp down.


The plant kind of fell apart when I removed the mix from it so I pick the healthiest looking piece and put it in the pot, fill the rest of the way with mix, and tamp down the mix very firmly with a hammer handle.


Water it in with B1...


...and put it where it will get normal watering.

Let's hope it come back strong.

Darryl Musick
Copyright 2019 - All Rights Reserved